Sunday, 8 March 2015

Pear and Gingerbread Upside Down Cake

This is more of a cold-weather cake, full of warming wintry spices. However, I thought I'd add the recipe here now, to enjoy on those colder days of spring! 

~

Pear and Gingerbread Upside Down Cake


You will need:


For the topping:
  • 50g unsalted butter            
  • 75-100g soft brown sugar
  • 4 ripe pears (peeled & halved) or medium tin drained

For the cake:
  • 100g self-raising flour               
  • 1/2 tsp bicarbonate of soda             
  • 1/4 tsp salt                                         
  • 2 tsps cinnamon                                 
  • 1 tsp ground ginger                            
  • 1/4 tsp ground nutmeg
  • Pinch of ground cloves
  • 1 beaten egg
  • 110ml soured milk (add few drops of lemon juice)
  • 100g soft brown sugar  
  • 75 g black treacle
  • 50g unsalted butter


Method:


Topping:
  1. Mix butter and sugar and beat for 2 mins with a wooden spoon or electric whisk until creamy. 
  2. Spread this all over the base of  your tin. (I used Nordic Ware Heritage Bundt Pan, but you could use any large tin)
  3. Arrange pears round side up, around the base, pressing them into the butter-sugar mixture.

Cake: 
  1. Set oven Gas 4-5.
  2. Mix sifted flour, bicarb, salt, spices in a large bowl until fully combined.
  3. Mix together the egg & soured milk in a jug. 
  4. Melt the butter in a saucepan and add the sugar and treacle, mixing til fully combined and the sugar is dissolved. 
  5. Once the mixture is cool, add egg & milk to this. Beat until thoroughly mixed.
  6. Add all the liquid ingredients to the flour, bicarb, salt & spices and mix well until smooth.
  7. Pour mixture over the pears. (Do not worry if it looks like a very small amount of mix, this cake should rise very well)
  8. Bake for 40-50 mins, until a skewer comes out clean.
  9. Turn the cake out while still hot, otherwise the sugar/butter topping will set hard and it will become stuck. 


As this is a very rich and sweet cake, I think it is best served with creme fraiche, to provide a slight sharpness. You could also serve with natural yogurt for the same effect. 


(Apologies for the Christmassy background...I have been meaning to post this for a while!)


Love, Chloe xx 


~  Follow me on Twitter @CrumbsCakeBlog ~


Wednesday, 4 March 2015

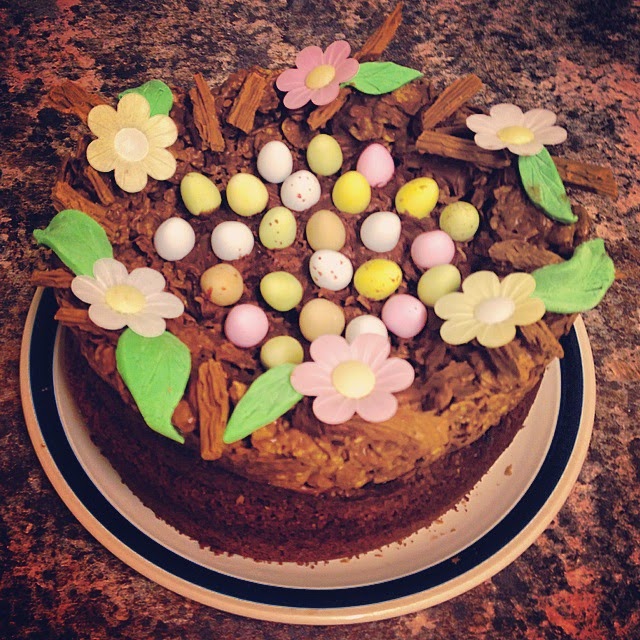
Easter Nest Cake

This is a really easy cake to make and looks very pretty once finished. It’s also the perfect alternative to a traditional Easter Simnel cake for those who prefer chocolate to fruit cake and marzipan!

~

Easter Nest Cake  


You will need:


For the cake

  • 175g margarine
  • 175g caster sugar
  • 3 large eggs
  • 150g self-raising flour, sifted
  • 50g of cocoa, sifted
  • 1tsp baking powder
  • 1tsp vanilla extract
  • Pinch of salt

For the nest
  • 5 shredded wheat “biscuits” (alternatively cornflakes can be used)
  • 200g-400g milk chocolate (depends on the cereal you are using)

For decoration
  • 1 tub Dr. Oetker Chocolate fudge icing
  • 6 x Dr. Oetker wafer daisies
  • Small amount of green fondant
  • 2 Cadbury’s Flake bars
  • Packet Cadbury’s mini eggs

Method


For the nest:
  1. Break up the shredded wheat into small pieces and place in a bowl. (If using cornflakes just place these directly into a bowl.
  2. Prepare one 18cm round tin by lining it with clingfilm.
  3. Melt the chocolate using a bain-marie method.
  4. Pour the chocolate, a little at a time, into the cereal and mix well to combine.
  5. Try to use the littlest amount of chocolate possible to allow all the cereal to be coated and allow it to start to stick together.
  6. Press the cereal-chocolate mixture into the tin in the thin layer over the base and up the sides – this will create your “nest.”
  7. Place the tin in the fridge and allow the chocolate to set hard.

For the cake:
  1. Heat the oven to 180°C. Grease 2x 18cm round tins with a little margarine.
  2. Put all of the ingredients in a large mixing bowl and beat with a wooden spoon or a hand-held mixer for 1 minute, or until just combined.
  3. Spoon the mixture into the tins and bake for 45-50 minutes. A skewer to the centre of the cakes should be pulled out clean.
  4. Leave the cakes until completely cool before decorating.

For the decoration:
  1. Roll out the green fondant and cut small leaf shapes out of it.
  2. Use a cocktail stick to scratch the detail into the leaves.
  3. Take the flake bars and cut them into small lengths to be more rough “branches” to add detail to the nest. 

For the assembly:
  1. Sandwich the two cakes together with chocolate fudge icing.
  2. Spread a generous amount of chocolate fudge icing across the top of the cake.
  3. Press the chocolate-cereal “nest” onto the top of the cake and allow to set firmly.
  4. Decorate the edges of the next with the fondant “leaves,” the flake “branches” and the wafer flowers, using the fondant icing to stick them.
  5. Finally, using small dots of chocolate fudge icing, stick the mini eggs into the centre of the nest.


Then the cake is complete!


Perhaps save making this one til after Easter if you’ve given up chocolate for Lent, as there’s an awful lot of chocolate …and temptation!


Love, Chloe xx 


~  Follow me on Twitter @CrumbsCakeBlog ~


Monday, 23 February 2015

Nando's Cake

I’ve never made a cake version of savoury food before, so this was a bit of a challenge. This was a 21st cake for one of my housemates who is quite partial to the occasional Nando’s meal! I’d like to thank Brighton Nando’s for donating the chip holder, napkins, takeaway wrapping paper and the famous Nando’s “medium” stick.

In order to make this authentic looking, I took a few shortcuts, such as using a shop bought jam roly-poly for the corn on the cob.

~ 

Nando's Cake 


You will need:


For the decoration
  • 10” cake board
  • Nando’s greaseproof paper
  • Nando’s napkins
  • Nando’s chip holder
  • Nando’s cocktail stick

For the sponge
In order to make the chicken shape, you need both a sandwich cake and a loaf cake. The amounts stated here are divided into equal amounts – one for each tin.
  • 2 x 3 eggs
  • 2 x 250g self-raising flour
  • 2 x 500g caster sugar
  • 2 x 500g margarine
  • 2lb loaf tin, greased and lined
  • 18in round tin, greased and lined

For the buttercream
  • 140g butter, softened
  • 280g icing sugar
  • 1-2 tbsp milk

For the corn on the cob
  • Jam roly-poly
  • Yellow fondant
  • Very small amount of white fondant
  • Brown gel food colouring
  • Small sponge brush (I used the one on the far left from an Asda paintbrush selection)
  • Cocktail stick
  • Shine spray (I used PME glaze spray, bought on Amazon)


For the chips
  • 12 Cadbury’s Fudge bars
  • Golden yellow fondant
  • Edible glue
  • Red sugar (to be peri peri salt)


For the chicken
  • 300g pale brown fondant
  • Brown gel food colouring
  • Golden yellow/orange food gel food colouring 

Method: 

For the sponges
  1. Heat the oven to gas 4.
  2. Cream the butter and the sugar together until pale with a wooden spoon.
  3. Beat in the eggs.
  4. Sift over the flour and fold in using a large metal spoon.
  5. The mixture should be of a dropping consistency; if it is not, add a little milk.
  6. Pour the mixture into the loaf tin and gently spread out with a spatula.
  7. Bake for 35-40 minutes until an inserted skewer comes out clean.
  8. Allow to stand until completely cool.
Repeat these steps with the second lot of ingredients and cook in the round tin.

For the buttercream
  1. Beat the butter in a large bowl until soft.
  2. Add half of the icing sugar and beat until smooth.
  3. Add the remaining icing sugar and one tablespoon of the milk and beat the mixture until creamy and smooth.
  4. Beat in the milk, if necessary, to loosen the mixture.

For the corn on the cob

  1. Unroll the jam roly-poly until it is about the width of a corn on the cob and discard the other layer.
  2. Cut a slice about 10cm long.
  3. Roll out the yellow fondant to about 1cm thickness.
  4. Spread the sponge with a small amount of the buttercream and cover it with the fondant.
  5. Scratch the shape of the individual sweetcorn into the fondant with the cocktail stick.
  6. Roll out a small amount of white fondant, and cut out two round shapes (about the size of a £2 coin) and stick these onto the ends of the cake with buttercream.
  7. Spray the “corn” with shine spray and sponge a small amount of brown gel food colouring onto the cake to look like charring.


For the chips

  1. Slice the fudge bars into three slices lengthways.
  2. Roll out the golden yellow fondant.
  3. Spread a very small amount of buttercream across the fudge bars, and cover them with a fondant.
  4. Repeat this over all the slices.
  5. Leave the “chips” to set in the fridge.
  6. When set, place the chips into the cardboard chip holder.
  7. Brush the top level of chips with edible glue, and sprinkle with red sugar to replicate the “peri peri” salt.
     

For the chicken

  1. The shape of the cake is created according to the following template.
  2. Cut the round cake to form the body of the chicken.
  3. The two edges cut off should be placed on either side of the top of the cake to build up the chicken “breast.”
  4. Cut out a triangle from between these two added bits. (Shown by the black area).
  5. Cut the loaf cake into the two thigh shapes, as shown by the template.
  6. Roll out the pale brown icing.
  7. Spread the entire cake with buttercream.
  8. Cover the cake with icing, pressing the fondant into all of the crevices and cut away the excess.
  9. Using the remainder of the fondant, make two "wings" by rolling out two thick sausage-shapes (about 10cm in length with the diameter of a penny). 
  10. Fold these sausages in half, and attach with cocktail sticks to either side of the "chicken."
  11. Using the sponge brush, press a mixture of brown and golden yellow gel food colouring over the whole chicken.
  12. Press the cocktail stick into the chicken


To finish the cake
  1. Assemble the constituent parts on the cake board, covered by the greaseproof paper.
  2. Add the napkins at one side. 

Now grab a knife and fork and tuck in! 


Love, Chloe xx 


~  Follow me on Twitter @CrumbsCakeBlog ~


Sunday, 15 February 2015

Blackforest Pavlova

I wanted to make a quick but impressive looking dessert for Valentine’s day which put a twist on the usual Blackforest flavour combination. I've added salted caramel and combined frozen cherries and fresh cherries for a mixture of textures. The marbled chocolate shards are really easy to make, and add a decorative edge. 

The best part of this dessert is that everything can be prepared in advance, and then the components can be assembled very quickly at the last moment before serving.

I always try and make some kind of plan before I make a cake, so I thought I'd include my scribbles in this blogpost as well! 

 ~
Blackforest Pavlova

You will need: 

For the meringue
  • 8 egg whites
  • 230g caster sugar
  • 230g icing sugar, sifted
For the decoration
  • 225g fresh cherries
  • 200g milk chocolate
  • 400 white chocolate
For the filling
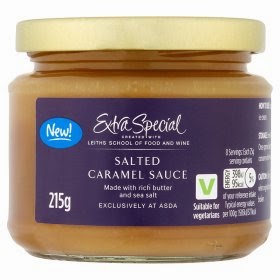
  • 200g salted caramel - (I used ASDA Extra Special salted caramel sauce, but you could make your own)
  • 600ml double cream
  • 350g frozen morello cherries
  • 2 tbsp caster sugar

Method:

For the meringue
  1. Preheat the oven to fan 100°C and line 4 baking sheets with non-stick greaseproof paper.
  2. Tip the egg whites into a bowl and beat with and electric whisk until they form stiff peaks.
  3. Begin to add the caster sugar, a spoonful at a time until fully incorporated. The meringue should look thick and glossy.
  4. Sift a third of the icing sugar into the mixture, then fold it in. Continue to sift and fold in the remaining icing sugar a third at a time.
  5. Divide the mixture between the 4 trays, spreading the mixture out into rounds.
  6. Bake for 1 1⁄2hours or until the meringues sound crisp when tapped underneath and are a pale coffee colour.
  7. Leave to cool on the trays or a cooling rack.

For the decoration
  1. Cover 3 baking trays in cling film and keep to hand.
  2. Melt the white and milk chocolate separately in a bain-marie.
  3. Once melted, divide the white chocolate between the three trays equally and pour over. Spread the chocolate into a thin layer with a spatula.
  4. Drizzle the milk chocolate over the white chocolate at random.
  5. Using the handle of a teaspoon, make “swirly” patterns in the chocolate to create a marble effect.
  6. Leave the chocolate to cool in the fridge.
  7. Once cooled, break into fragments of different sizes and shapes. There is no accuracy to this, the rougher the better!
  8. Set the shards aside until decoration.

(Unfortunately I forgot to take a picture of this stage, but the chocolate marble shards can be seen in the final photos)


For the filling
  1. Using an electric whisk, whip the cream until softly whipped. Return to the fridge until required.
  2. Place the frozen cherries into a saucepan and heat on the hob until fully defrosted.
  3. Strain the cherries, retaining the liquid. Place the cherries aside and return the juice to the saucepan.
  4. Add the caster sugar and heat very slowly until a thick syrup is formed. Place this aside until required.
(You could even add a dash of cherry brandy to the reducing syrup for a more grown-up take on the dessert)


Assembling the dessert
  1. Place one meringue layer on a plate and cover with a layer of cream, followed by salted caramel and finally a drizzle of the cherry syrup.
  2. Dot one third of the frozen cherries all over (as there will be none on the top layer).
  3. Place the next layer on and repeat the filling with cream, caramel, syrup and cherries.
  4. Repeat until the final layer is placed on the top.
  5. Cover this with the remaining cream and then “stud” it with the fresh cherries.
  6. Then, stand some of the chocolate shards in the cream on the surface and stick others horizontally between the layers of meringue into the cream filling.
  7. Finally, drizzle with the remaining salted caramel and cherry syrup and serve!


You’re finished! This dessert is best eaten in the first 2 days after serving, as the meringue may start to get a little soggy (but if you’re anything like me – the dessert won’t last two days anyway!)


Love, Chloe xxx


~  Follow me on Twitter @CrumbsCakeBlog ~

Monday, 22 December 2014

❄️ Gluten-Free Christmas Cake ❄️

This is my take on the traditional Christmas cake, with a few subtle differences (fondant icing use being one of them). This is simply for ease and I prefer the taste. You could easily substitute the fondant icing for royal icing.

This recipe is gluten-free and absolutely packed with dried fruit and nuts. I've suggested a few methods of decoration, as shown by the accompanying photos. This recipe provides the amounts to make the large, round cake shown in the photos. The smaller cake was made by halving the quantities and placing in a 1lb loaf tin.

This recipe can be made in two days, with one day of fruit soaking and making the cake on the second day, if necessary - so it is perfect for last minute baking with everything else going on at Christmas time! However, I'd suggest leaving time for a week of fruit soaking, so that they are nice and plump with brandy and fruit juice to keep the cake moist.


 ~
❄️ Gluten-Free Christmas Cake ❄️ 


You will need:

For the fruit:
  • 500g Dried fruit (raisins, cranberries, chopped apricot etc.)
  • 100g  Candied peel
  • 100g Glacé cherries
  • 5tbsp Brandy
  • Juice and zest of 1 orange
  • Juice and zest of 1 lemon

For the cake:
  • 125g Butter
  • 50g Muscovado sugar
  • 75g Soft brown sugar
  • 3 Eggs
  • 2tsp Mixed spice
  • 1/2 tsp Ground ginger
  • Juice and zest of 1 orange
  • Juice and zest of 1 lemon
  • 160g Gluten-free plain flour
  • 1 Green apple (e.g. Granny Smith), grated
  • 100g Flaked almonds

For the icing:
  • 6 tbsps Apricot jam
  • 200g Golden Marzipan
  • 300g White fondant icing

For the decoration:
  • Icing sugar
  • Silver dragées in at least 2 different sizes (I used Asda's own "silver balls" and Dr. Oetker's "chocolate silver pearls") 
  • Silver edible paint and paintbrush (optional)

Equipment:
  • Piping bag and small round nozzle
  • Silver cake board
  • Snowflake icing embosser (optional)
  • Icicle pattern icing embosser (optional) (Mine was free from a magazine called "Cake Decorating") 
  • Ribbon (optional)


Method:

For the fruit:
  1. Between 1 day and 1 week before making the cake, soak the dried fruit, candied peel and glacé cherries in the brandy and zest and juice of the lemon and orange in a shallow dish.
  2. Stir every now and again to ensure that all fruits are fully exposed to the fruity, alcohol syrup which should be developing.


For the cake:
  1. Preheat the oven to Gas 2/150°C.
  2. Cream together butter and both types of sugar until fluffy.
  3. Beat in the eggs, a little at a time.
  4. Then add mixed spice, ground ginger,  orange and lemon rind & juice.
  5. Fold in the flour.
  6. Stir in the mixed dried fruits, glace cherries, mixed peel which have been soaking, as well as the syrup they have been soaking in.
  7. Fold in the almonds and grated apple.
  8. Place the mixture into a deep, greased, 20cm cake tin and smooth over the top.
  9. Bake for  about 2 hours, or until golden and a knife comes out clean.
  10. Allow to cool completely in the tin.

For the icing
  1. Warm the apricot jam in the microwave for about 20s and then pass through a sieve.
  2. Spread a very small amount onto the cake board, and press the cake onto this.
  3. Spread half of the remaining jam  over the cake.
  4. Roll out the marzipan and lift it onto the cake, pressing it to the sides and trimming any excess.
  5. Spread the marzipan with the remaining apricot jam
  6. Roll out 250g of the white fondant icing and lift this onto the cake, again pressing the sides and trimming the excess.
  7. Leave the icing to set for a few hours.

For the decoration:
  1. Combine icing sugar with a small amount of water until a thick, smooth consistency is achieved.
  2. Place the icing into a piping bag and squeeze a thin line around the base of the cake, slowly pressing a mixture of different sized silver dragées into the icing.
  3. Silver dragées can also be used to decorate the sides of the cake if pressed into small dots of icing. 

Optional extras:
  1. You could fix a ribbon around the sides of the cake , attaching the ends with a little of the piped icing
  2. You could press an icicle pattern embosser into the sides of the cake to decorate.
  3. You could also cut out snowflake patterns with the remaining fondant icing using mould and paint these with edible silver paint.


Hope you enjoy this recipe. 


TOP TIP: Christmas cake is best enjoyed in a daft Christmas jumper and Father Christmas hat! 

 Merry Christmas!

Love, Chloe xx


~  Follow me on Twitter @CrumbsCakeBlog ~